Your team: users, roles and permissions
How to give each colleague their own login, decide what each of them is allowed to do, and fix the permission problems that come up most often.
How your colleagues get a login
Everyone who works in your ERP needs a login of their own, so that every document carries the name of the person who actually made it.
You create those logins in the control panel at app.nezmaro.com, on the Users page. The control panel creates the matching person inside your ERP at the same moment, so you never enter anybody twice.
You never choose, see or type anyone's password. Your ERP emails each new colleague a link, and they set their own password from it. If they forget it later, they use the Forgot password link on your ERP's sign-in page.
Who sends the sign-in link
Every new person receives an email with a link to set their own password. Nobody is ever sent a password.
- On day one, Nezmaro sends it. Until your ERP has its own outgoing email, the link comes from noreply@nezmaro.com and names your company. A blue box above the form says Sign-in links are sent by Nezmaro for now. There is a daily limit on these, generous for a team and far too small for anything else: per company, and per address.
- Once your own outgoing email is set up, your ERP sends it, from your address. Open Team & messages → Marketing tools and fill in the outgoing email card with the details from your mail provider; the Marketing tools chapter explains every field. You need this anyway for everything else your ERP sends — invoices, statements, campaigns and its own notifications.
Adding a colleague
This is the one procedure you will repeat for every new member of staff.
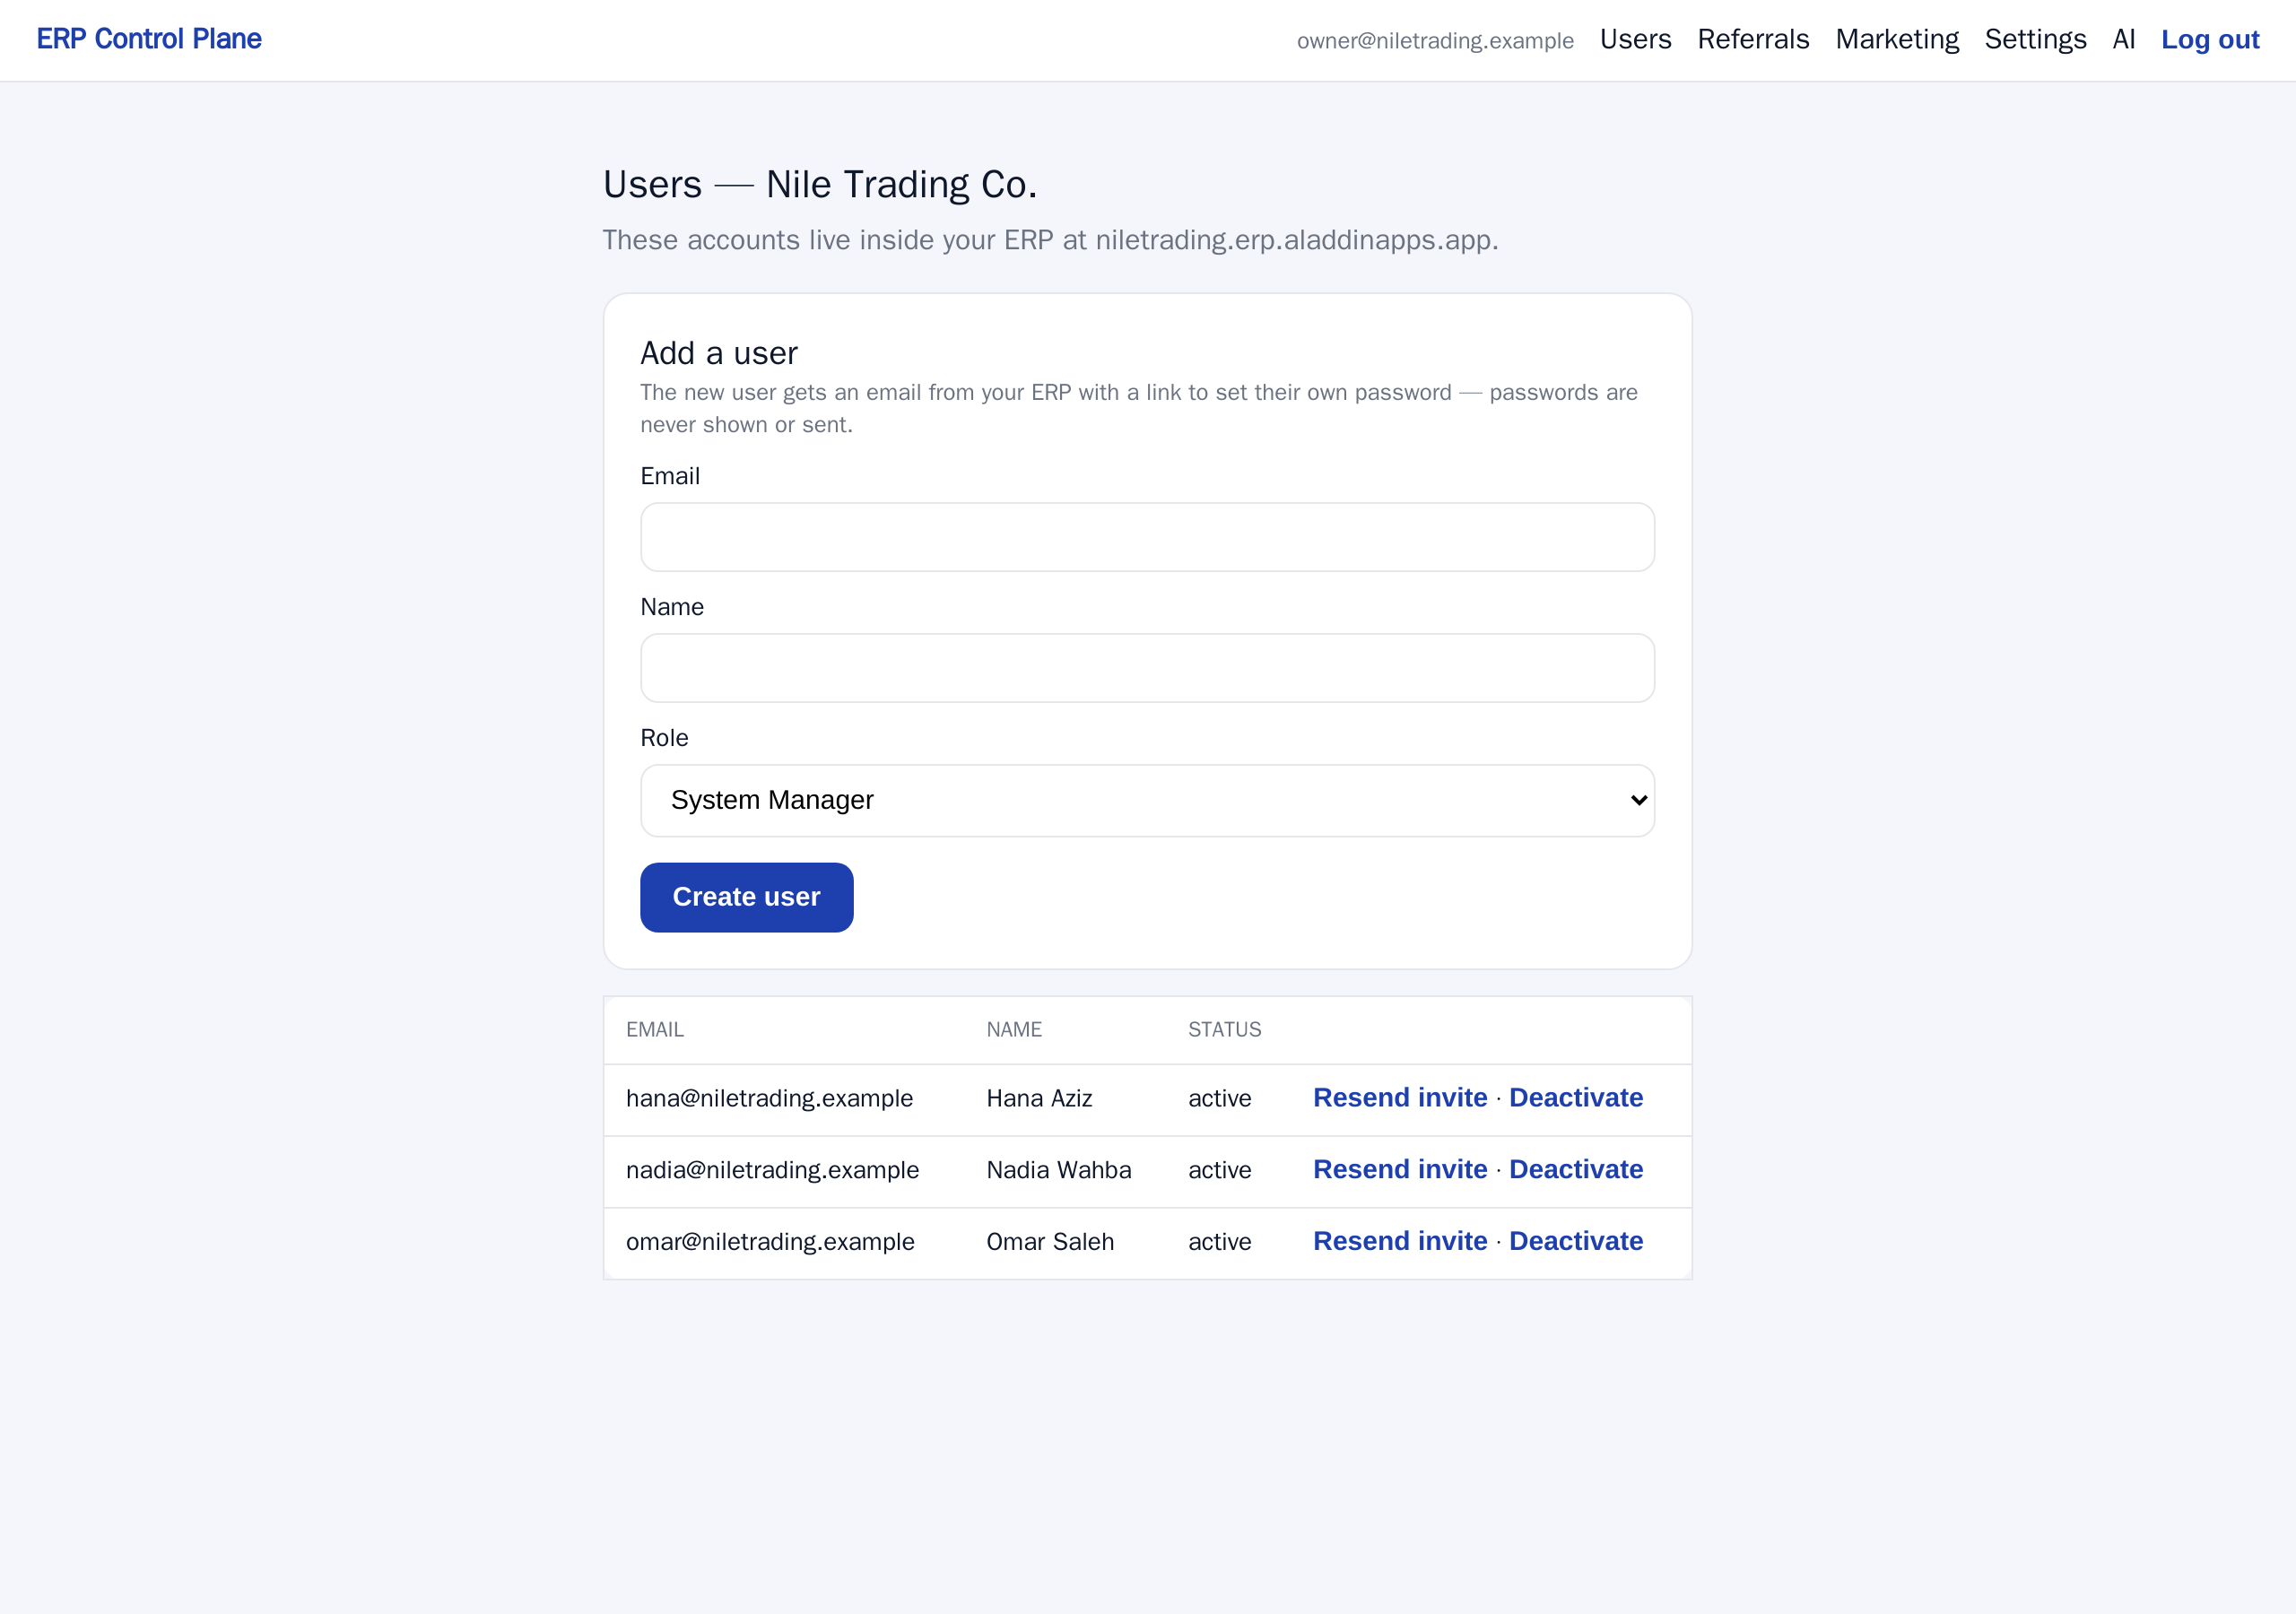
- In the control panel, open Users. The top of the page shows how many seats you are using, for example Active users: 3 / 5.
- In the Add a user card, type the person's Email. This becomes their login name, so use a real address they can open.
- Type their Name as it should appear on the documents they create.
- Pick one Role from the list — the job they mainly do. The next section explains what each one opens up, and you can add more roles later.
- Click Create user. A green message confirms the person will receive an email from your ERP with a link to set their own password, and their row appears in the table below with the status active.
What each role can do
A role is a job description, not a rank. It decides which parts of your ERP a person can open and which documents they can create. Giving people only the roles their job needs keeps their screen simple and prevents accidental damage.
These are the roles the control panel offers when you add someone.
| Role | Suits | What it opens up |
|---|---|---|
| System Manager | The owner only | Full control — settings, users, permissions, every part of the system. Keep this to yourself and at most one trusted deputy. |
| Accounts User | Accountant, bookkeeper | Invoices, payments, accounting corrections and the financial reports. |
| Sales User | Salesperson | Quotations, sales orders, customers, and the list of people who might buy. |
| Purchase User | Whoever buys | Purchase orders, supplier records, and records of goods received. |
| Stock User | Storekeeper, warehouse staff | Stock movements, delivery notes, stock counts and warehouse reports. |
| HR User | HR or office administrator | Employees, attendance, leave requests, payroll records. |
| Projects User | Project or site engineer | Projects, tasks, hours worked, and what each project costs. |
| Employee | Every member of staff | The basics everyone needs: their own profile, leave requests, expense claims. Harmless to add on top of any other role. |
| Sales Manager | Whoever supervises sales | Everything a Sales User can do, plus approvals, larger discounts, and the full sales reports. |
| Newsletter Manager | Marketing | Email campaigns, newsletters and subscriber lists. |
| Website Manager | Marketing | The public website and blog pages that come with the system. |
A typical small company
If your company looks like most of our customers, start from this and adjust it rather than inventing something from scratch.
| Person | Give them | Why |
|---|---|---|
| Owner / manager | System Manager | Someone must be able to change settings and add users. Ideally one person. |
| Accountant | Accounts User + Employee | Full access to the books without the power to reconfigure the system. |
| Salesperson | Sales User + Employee | Can quote and sell, cannot see or change the accounts. |
| Storekeeper | Stock User + Employee | Records what physically moves in and out, nothing financial. |
| HR / office admin | HR User + Employee | Staff records and leave, separate from sales and money. |
Your accountant
Your accountant does not need one of your user seats, and should not be able to change anything. On Users, Invite your accountant: their email and a name. They receive a link from your ERP to set a password and land on the Accounting page with a read-only role of its own: every invoice, payment, entry and ledger to read, filter and export, the General Ledger, Trial Balance, Profit and Loss, Balance Sheet, receivables and payables reports to run — and no button to create, change, submit or delete. When the engagement ends, Deactivate on the Users page.
How many people can use your ERP
Your plan sets the number of seats — people who are allowed to sign in. Knowing how the count works saves you a surprise on the day you hire someone.
| Plan | Price | Users | Storage |
|---|---|---|---|
| Starter | $29 / month | 5 | 10 GB |
| Pro | $79 / month | 20 | 50 GB |
Only active people count. Someone you have deactivated stays in the list and keeps their name on old documents, but does not use a seat. The Users page shows the count at the top, for example Active users: 5 / 5.
When the plan is full, Create user returns a message such as User limit reached: your Starter plan allows 5 active users. Deactivate someone or upgrade. Nothing breaks and nobody is locked out. You have two ways forward:
- Free a seat — deactivate someone who has left the company (see the last section of this chapter). The seat is available immediately.
- Upgrade the plan — move from Starter to Pro by emailing support@nezmaro.com. Plan changes are made by us; there is no upgrade button in the control panel. Once the change goes through, your ERP picks up the higher seat limit automatically.
Giving someone more than one role
The control panel gives a new person one role. Real jobs often need two or three — a salesperson who also handles purchasing, for example. You add the extra roles inside your ERP, not in the control panel.
- Sign in to your ERP with an account that has the System Manager role.
- Press
Ctrl+G, type User List and open it. You see every person on your ERP. - Click the person you want to change. Their record opens.
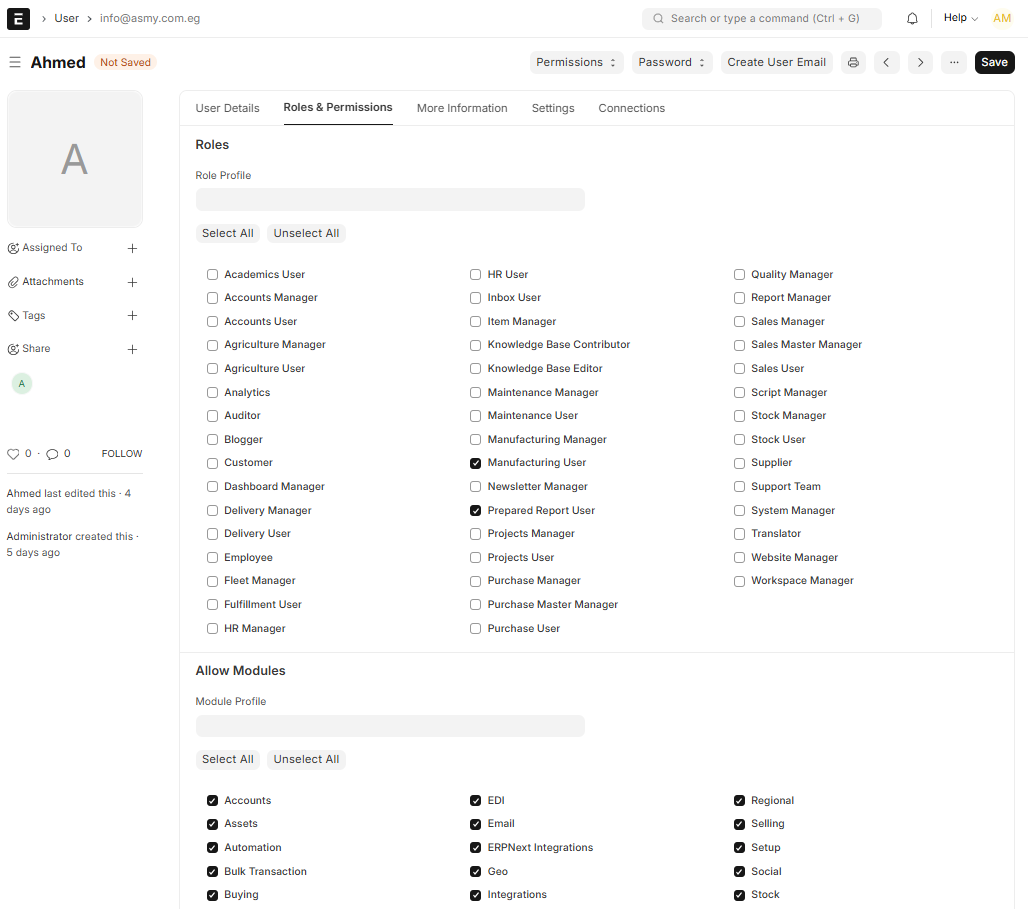
- Scroll to the Roles section and tick the extra roles they need.
- Click Save (
Ctrl+S). The change applies the next time that person reloads the page.
Saving a set of roles for reuse
If you find yourself ticking the same three roles for every new salesperson, save the combination once instead of remembering it. In your ERP, search for Role Profile, create a new one, name it something like Sales staff, and tick the roles. From then on you set that one profile on a person's record, and everyone doing the same job ends up with the same access.
The Role Permission Manager
Underneath roles there is a deeper screen called the Role Permission Manager. It controls, for each role, exactly which kinds of document may be read, changed, created, deleted, submitted or cancelled. You should know it exists.
When someone sees a permission message
Sooner or later a colleague will report that your ERP told them something is not permitted. This is not a fault. It means one thing: that person does not hold a role that gives them access to that kind of document.
- Ask what they were trying to open — the kind of document, such as a sales invoice, a stock movement or an employee record.
- Decide whether that person should be doing it at all. Sometimes the answer is no, and your ERP did exactly its job.
- If the answer is yes, add the matching role to their record using the steps above, then ask them to reload the page and try again.
Staff logins and customer logins are different
Every person on your ERP is one of two types, and mixing them up is the usual reason a new colleague signs in and finds an almost empty screen.
- System User — a member of staff. Signs in to the full working screen (the
address ending in
/app), uses the modules and creates documents. Every colleague you add from the control panel is one of these, and each one uses a seat on your plan. - Website User — a customer or supplier. Signs in only to the public portal to look at their own orders or invoices. They cannot open the working screen or use any module, and they do not appear on the control panel's Users page or use a seat.
If a colleague sets their password correctly but lands on a plain page showing only My Account and no modules, they were created as a Website User. Open their record in the User List inside your ERP and check the User Type field.
When someone leaves
People leave. When they do, deactivate them — do not delete them, so the history of what they did stays intact.
- In the control panel, open Users and find the person in the table.
- Click Deactivate in their row.
- The page reloads with the message User deactivated, their status changes to deactivated, and the seat count at the top drops by one.
They can no longer sign in, but every invoice, order and stock movement they created keeps their name. That trail is the point: a year later you may need to know who issued a credit note, and an accountant or tax inspector will ask. Deleting a person throws that away and can leave documents pointing at somebody who no longer exists.
If they come back, click Reactivate in the same row, provided you have a free seat.